Cypress Cucumber is a powerful testing framework that combines Cypress and Cucumber. It allows developers and QA engineers to write tests in a human-readable format using Gherkin syntax, promoting understanding and collaboration. With Cypress Cucumber, teams create executable specifications that bridge business requirements and automated tests, ensuring comprehensive software testing and adherence to desired specifications.
Cucumber is a well-known Behavior-Driven Development (BDD) framework that lets developers implement (or perform) end-to-end testing. The Cucumber framework is fundamentally designed to assist developers in writing acceptance test cases that are easily understood by any user accessing the software.
Test cases are written based on the behavior of the application’s functions. They are written in a language that is easily understood by normal users. This framework feature makes it a popular BDD testing tool connecting the gap between the product owners and the developers.
Another reason the framework is so popular as a BDD testing tool is that the framework uses a language called Gherkin. Gherkin is the language used by Cucumber developers to define tests. Since it is written in plain English, it is easy to understand even for a non-technical user.
The combination of Cypress and Cucumber provides a robust framework that permits you to form purposeful tests in a simple method.
%[INVALID_URL]%
In this Cypress Cucumber tutorial, we will dive deep into using Cucumber with Cypress to write tests more efficiently and easily.
Struggling with messy PHP Formatter & Beautifier Online scripts? Our PHP Beautifier Online tool provides clean and structured formatting. Beautify your code and Improve readability today!
What is BDD?
Behavior-Driven Development (BDD) is a development approach that promotes communication between team members. This collaborative approach brings together the business and technical aspects of projects. BDD simulates how an application should behave from the end user’s perspective. The main goal of implementing BDD testing is to improve collaboration between developers, QA, DevOps, PO, BA, and other stakeholders.
BDD enables teams to communicate requirements better, detect problems early, and easily maintain software over time. The first is to make sure the entire team understands the requirements. Then teams can focus on preventing potential problems rather than fighting fires if they are found later. BDD ensures that everyone is in the loop from the beginning and throughout the process, which helps effective and quality communication between team members.
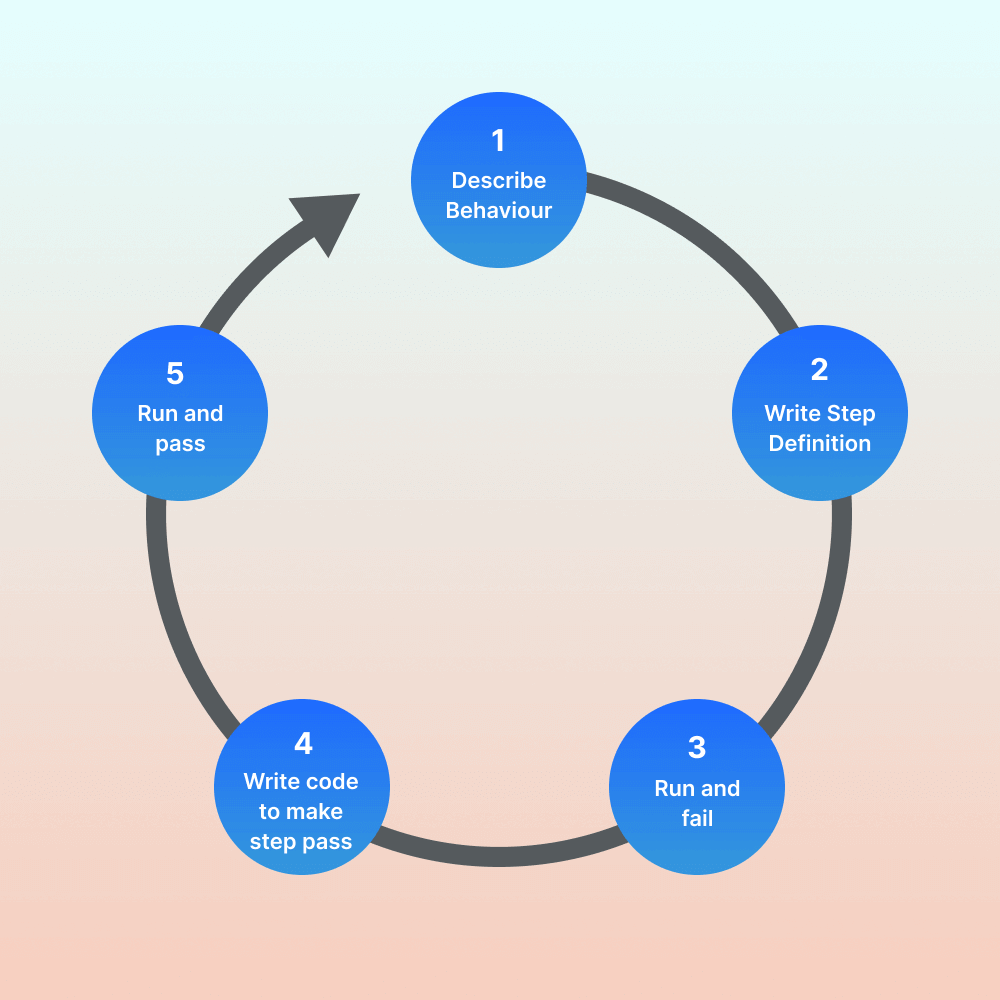
The below diagram gives us a summary of the steps involved in the BDD workflow.
Struggling with messy Python Formatter & Beautifier Online scripts? Our Python Beautifier Online tool provides clean and structured formatting. Beautify your code and Improve readability today!
BDD frameworks in the market
Some of the available BDD frameworks in the market are Cucumber, Quantum, SpecFlow, JBehave, Codeception, and others.
Cucumber is one of the market’s foremost well-liked BDD testing frameworks. Cucumber supports a variety of different programming languages, including Java and JavaScript.
Quantum is a Java-based open-source BDD testing framework designed by Perfecto.
SpecFlow is the most in-demand .NET BDD framework developed by TechTalk.
JBehave is a foremost Java-based BDD framework and other JVM languages, such as Groovy, Kotlin, and Scala.
Codeception is a famous PHP framework inspired by BDD. Codeception is a full-stack testing framework that achieves unit testing, API testing, and functional testing in addition to BDD testing.
Don’t let encoding IDNs slow you down. Save time and hassle with our IDN Encode free online tool to quickly and easily converts internationalized domain names. Try it now!
What is Cucumber?
Cucumber is an open-source framework that supports BDD. Cucumber supports the Gherkin language, and in Gherkin, we can write our use cases in plain English that the tool reads easily. Cucumber reads the test written in Gherkin and verifies that the code works as it should. It does this by working on Gherkin scenarios and steps. Once all test cases are executed, a Cucumber report is generated with each step and scenario with pass and fail results.
Convert your XML files to JSON format without any hassle using our reliable and efficient XML to JSON converter tool. No installation or download required!
What is Gherkin?
Gherkin is a language that developers use to write tests in Cucumber. Since Gherkin uses plain English, it’s meant to define use cases for a software system so that almost anyone can read and understand the use cases. The syntax of Gherkin promotes behavior-driven development because it allows developers, managers, business analysts, and other stakeholders to understand the project’s requirements and the life cycle.
Use of Gherkin language in writing the story by POs, BA’s makes stories more focused and easy to understand for the technical and non-technical side. Also, it becomes very easy for QA people to write their automation script because now requirements are more clear compared to when we are not using Cucumber with Gherkin syntax.
Gherkin uses easy English-like language that you could use to define the requirement and acceptance criteria. The most important basic format is as follows.
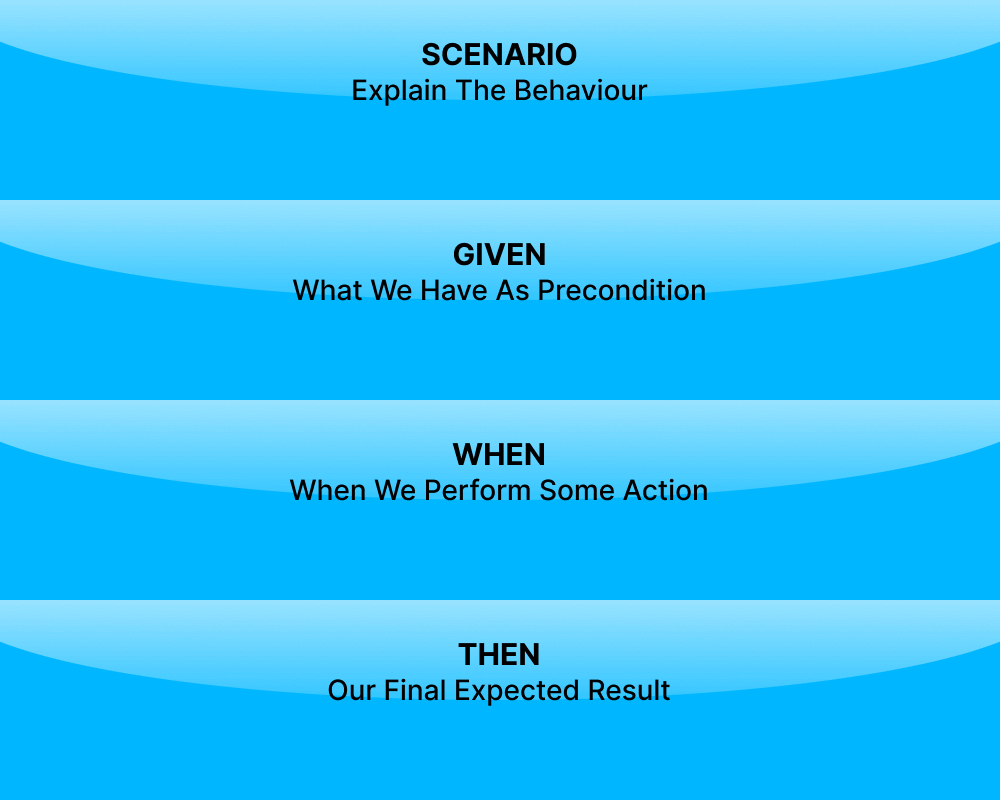
So, how does it work? First, you have to explain the feature that we want to implement, usually in the classic form of a user story: As a <person>, I Want <feature>, For <Business Value>.
Then you can define one or more business scenarios, meaning the overall behavior you want to receive with the user story.
Example:
Feature: Payments with Master Card.
As a Master Cardholder,
I Want to use my Master Card,
For paying my online bill.
Scenario: The Master Cardholder uses the Master card for online payment.
    Given I am a Master Card Holder.
    When I make online payments with my Master Card.
    Then My master card is accepted
Simplify the process of converting JSON to YAML with our online JSON to YAML converter tool to convert JSON files to YAML. No sign-up required. Get started now!
Gherkin Syntax
Next, let’s take a look at some of the steps in the Gherkin tests. These are Given, When, Then, And, or But.
Given
The objective of the Given steps is to get the system to a known state before the user (or an external system) starts interacting with the system (in the When steps).
Suppose we have to login into a site https://ecommerce-playground.lambdatest.io/ . So before login, we have to open the login screen so the user can login into the system. So we have to bring the system into the state where he can start interacting with the system (in the When steps).
Some examples to support the Cypress Cucumber tutorial are as follows:
Example 1:
Given I am on the "login page of lambdatest”
Example 2:
Another example may be supposed we want to create records into the database or set up the database, so in the Given statement, we can give the below detail.
Given There are no users on-site.
Given The database is clean.
When
When steps are action steps. The purpose of the When steps is to describe the key action the user performs. It’s suggested that you only have one When step for each scenario.
Let’s take the example of the LambdaTest e-commerce site.
Given I am on the "login page of lambdatest”
When I enter "the username" with "abc@xyz.com"
When I enter the "password" with "123456"
When I press "login
Then
Then steps are the outcome steps. Then syntax can only be used in conjunction with the When syntax. In the Then section, we can describe what you want the system to do so that it can be compared to how the software works in practice.
Let’s take the example of the LambdaTest e-commerce site.
Given I am on the "login page of lambdatest”
When I enter "the username" with "abc@xyz.com"
When I enter the "password" with "123456"
When I press "login"
Then user should be logged into the application
And, But
If you have several Given, When or Then steps then in that case you can use And, But. This helps keep your documentation managed and readable.
Example 1:
Scenario: Multiple Givens
  Given one thing
  Given another thing
  Given yet another thing
  When I open my eyes
  Then I see something
  Then I don't see something else
We can add And, But in above example
Scenario: Multiple Givens
  Given one thing
  And another thing
  And yet another thing
  When I open my eyes
  Then I see something
  But I don't see something else
Example 2:
Let’s take the example of the LambdaTest e-commerce site.
Given I am on the "login page of lambdatest”
When I enter "the username" with "abc@xyz.com"
When I enter the "password" with "123456"
When I press "login"
Then the user should be logged into the application
We can add And, But in above example
Given I am on the "login page of lambdatest”
When I enter "the username" with "abc@xyz.com"
And I enter the "password" with "123456"
And I press "login"
Then the user should be logged into the application
Background
Background allows you to add even more context to the scenarios in a feature. The Background is run before each of your scenarios. There can only be one background step for each feature.
Feature: Search and Edit Article
Background:
Given the user in the login page
  When I enter "the username" with "Admin"
  And I enter the "password" with "123456"
  And I press "login"
  Then the user should be logged into the application
  Scenario: Search the blog
    When I search blog “Cypress "
    Then I should see "Cypress text in searched results"
  Scenario: Edit the blog
    When I edit the existing Post
    And Click on Submit button
    Then I should see "Your article was published”
Scenario Outline
The script outline runs once for each line of the example section except the header line. The steps of a scenario outline provide a template never executed directly. The scenario overview runs once for each row in the Examples section below (not counting the first row of the column headers).
Scenario Outline: Login into the Application
 Given I am on the "login page of lambdatest”
  When I enter <username>
  And enter <password>
 Then the user should be logged into the application
Examples:
    | username | password |
    |  test1@qa.com   |  ba@8838  |
    |  test2@qa.com   |  b3a@8$3  |
    |  test3@qa.com   |  xSba@3e3  |
Table
Tables are used for specifying a larger data set — usually as input to a Given or as expected output from a Then.
Examples:
    | username | password |
    |  test1@qa.com   |  ba@8838  |
    |  test2@qa.com   |  b3a@8$3  |
    |  test3@qa.com   |  xSba@3e3  |
GitHub Repo: https://github.com/LambdaTest/hyperexecute-cypress-v10-sample
In the next section of this Cypress Cucumber tutorial, let’s see how we can implement the BDD framework on cloud Cypress Grid.
In this Cypress Cucumber tutorial, we have covered two ways of running the test cases one by running the test case locally and another by running the Cypress test case in the LambdaTest cloud Grid.
Once you get used to requirements and user stories being written in Cypress Cucumber tutorial, the next step is transforming these .feature files into an automation script. Below are some steps we commonly use to automate with Cucumber.
Product owner and business analyst work together to formulate the feature’s requirements.
Define the acceptance criteria.
QA Team converts Gherkin statements into automated tests (.feature file).
QA Team executes .feature file.
QA Team prepares automation scripts using .feature file.
Script execution and test results.
We have several frameworks, from Cucumber to Behave, that can automate your Gherkin acceptance criteria.
For automating Gherkin acceptance criteria in this Cypress Cucumber tutorial, we are using Cucumber with Cypress.
Need to convert BCD codes to Decimal quickly? Our BCD to Decimal Converter tool provides an easy way to convert BCD codes to Decimal. Try it now and save time!
How to set up Cypress to test locally?
In this section of this Cypress Cucumber tutorial, we will install and set up Cypress to perform testing on the local Cypress Grid.
Installing Cypress
Below are the steps to install Cypress. However, you can go through this blog to get started with Cypress testing.
Step 1: Create a folder and Generate package.json.
Create a project, naming it cypress_Cucumber_BDD.
Use the npm init command to create a package.json file.
Step 2: Run the below command to install Cypress.
In the project folder, run > npm install — save-dev cypress@9.2.1.
We can see below after installation that Cypress version 9.2.1 is reflected. The latest version of Cypress is 13.2.0.
npm install cypress-cucumber-preprocessor.
npx cypress open.
Step 3: Add the following configuration Cypress environment files under plugins/index.js file.
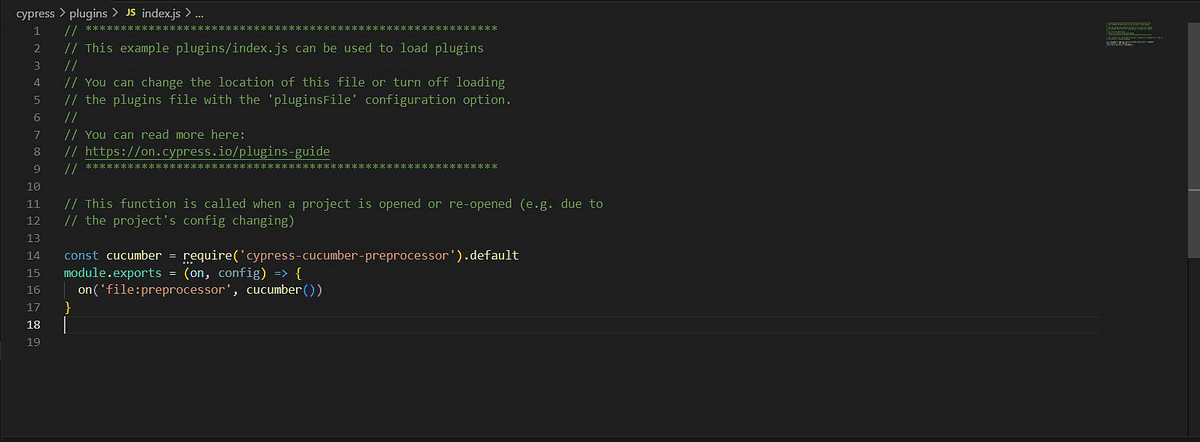
Step 4: Within the package.json file, add the following configuration.
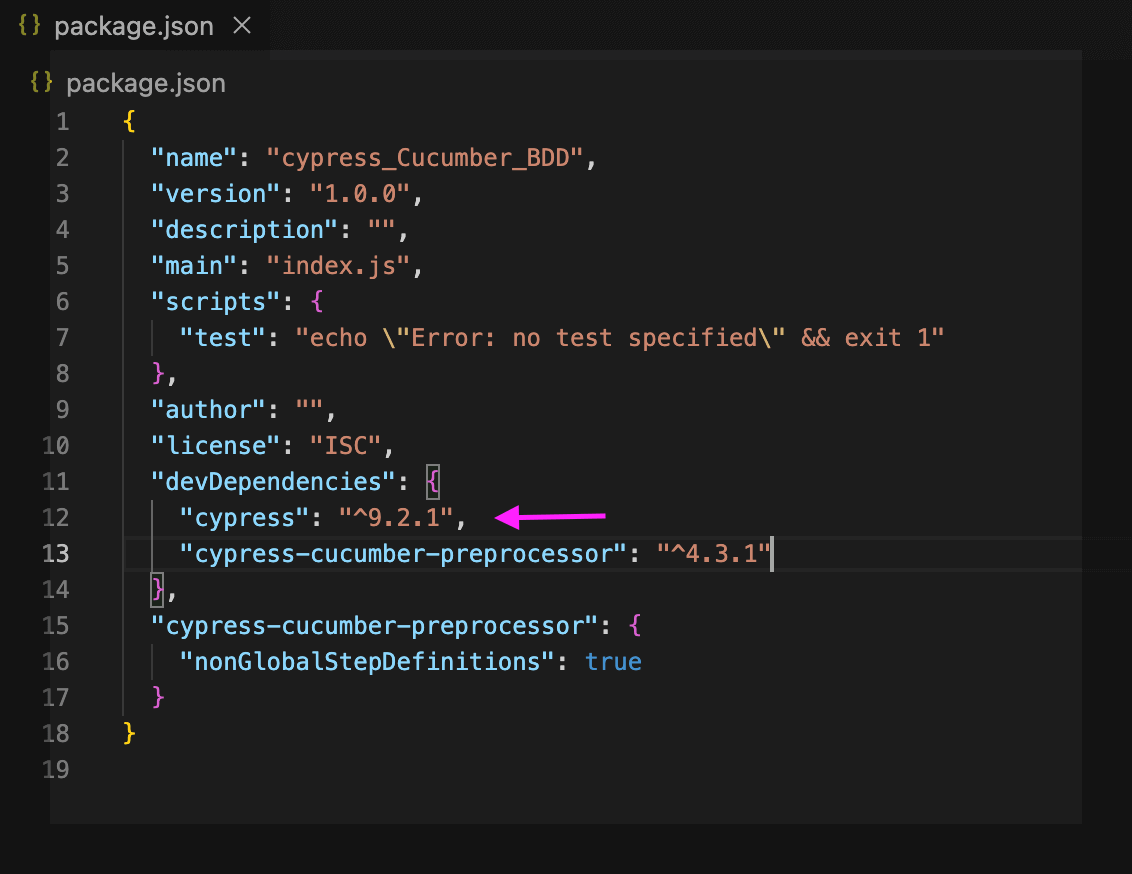
Step 5: In the spec files extension parameter in the cypress.json file, make sure to point to the feature files.

Step 6: Create one feature file and one .js file in the integration folder.
Feature file:

.js file:

Looking for a tool to generate random text? Use our free online Random Character Generator to generate random characters for all your purposes. Try it out today.
Create Test and Page Class
Follow the below Cypress Cucumber tutorial steps to learn how to Create Test and Page Class.
Step 1: Create a folder under the Integration folder.
Create the folder “cucumber” under the folder Integration, Integration -> cucumber.
Under LambdaTest, create two more folders with the names Pages and Tests.
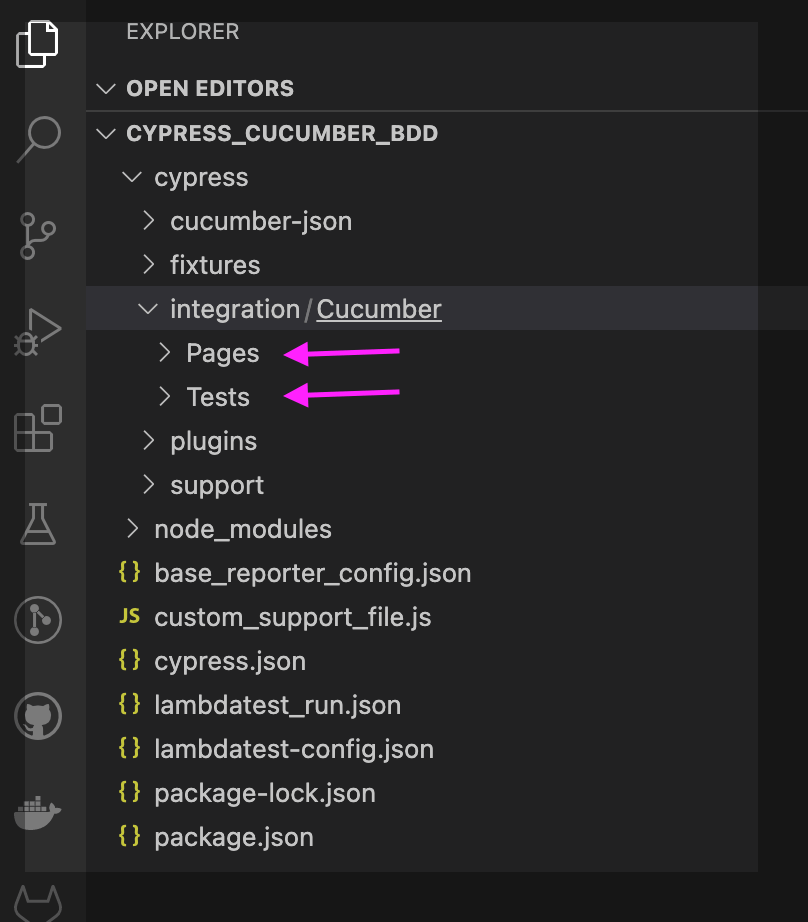
Step 2: Create two sub-folders.
Create two sub-folders under the Pages folder with the name (LoginPage and SearchProductPage).
Create two sub-folders under the Tests folder with the name (LoginTest and SearchProductTest).
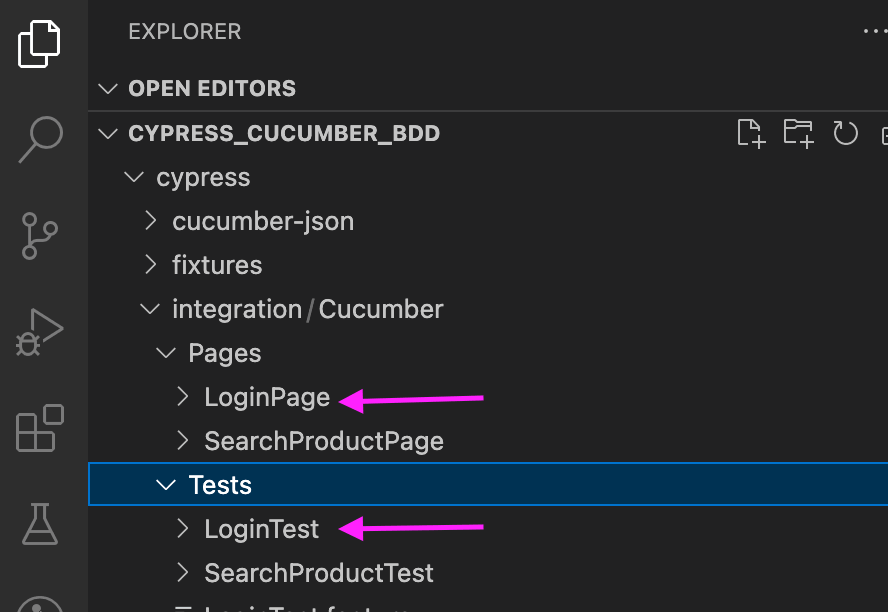
Step 3: Create .spec files under Pages and Tests.
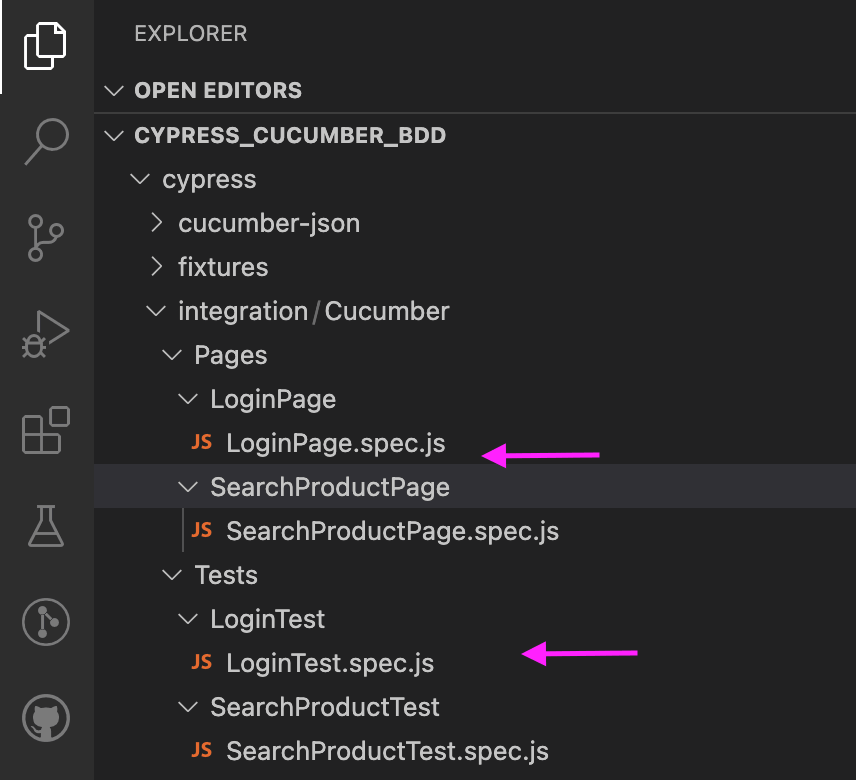
You can learn more about Page Object Model (POM) through this blog on Cypress Page Object Model.
Tired of using old colors? Get your creative juices flowing with our free online random color generator. Try our tool to find fresh new hues.
Code Walkthrough
Below is the code detail for the Page and Test class. In this Cypress Cucumber tutorial, we are covering two scenarios; we will execute the test case in Cypress version 9.2.1.
Implementations (Test Scenario — 1)
To demonstrate the usage of Cypress, we will first demonstrate the following test scenario.
Open the URL https://ecommerce-playground.lambdatest.io/index.php?route=account/login
Enter your email address
Enter the password.
Click on the Login button.
Verify the title of the page.
Create LoginPage.spec
In the below code, we can see we first login into the application and then verify the page title.
/// <reference types="cypress" />

 import login from "../../Pages/LoginPage/LoginPage.spec";

 Given("I navigate to the Website", () => {
  login.enterURL();
 });
 When("I entered valid credential", (datatable) => {
  datatable.hashes().forEach((element) => {
    login.enterUserNamePassword(element.email, element.validpassword);
  });
 });

 And("User click on sign in button", () => {
  login.clickSubmitButton();
 });

 Then("Validate the title after login", () => {
  login.verifyPageTitle();
 });
Implementation (Test Scenario — 2)
Here is the test scenario:
Open the URL https://ecommerce-playground.lambdatest.io/index.php?route=account/login.
Enter your email address
Enter the password.
Click on the Login button.
Verify the title of the page.
Search the product.
Verify the product after the search.
Create SearchProductTest.spec
In the code below, we can see we first log into the application, verify the page title, and finally search for the particular product on the site.
/// <reference types="cypress" />

 import login from "../../Pages/LoginPage/LoginPage.spec";
 import searchProduct from "../../Pages//SearchProductPage/SearchProductPage.spec";

 Given("I navigate to the Website", () => {
  login.enterURL();
 });
 When("I entered valid credential", (datatable) => {
  datatable.hashes().forEach((element) => {
    login.enterUserNamePassword(element.email, element.validpassword);
  });
 });

 And("User click on sign in button", () => {
  login.clickSubmitButton();
 });

 Then("Validate the title after login", () => {
  login.verifyPageTitle();
 });

 When("User search the product", () => {
  searchProduct.SearchProduct("VAIO");
 });

 Then("Validate the product after search", () => {
  searchProduct.verifyProduct("Sony VAIO");
 });
Create LoginPage.spec.js
/// <reference types ="cypress"/>
class LoginPage {
enterURL() {
cy.visit(
"https://ecommerce-playground.lambdatest.io/index.php?route=account/login"
);
}
enterUserNamePassword(username, password) {
cy.get('[id="input-email"]').type(username);
cy.get('[id="input-password"]').type(password);
return this;
}
clickSubmitButton(username, password) {
cy.get('[type="submit"]').eq(0).click();
return this;
}
verifyPageTitle() {
return cy.title().should("eq", "Search -");
}
clickOnLogo() {
cy.get('[title="Poco Electro"]').click();
cy.wait(2000);
}
scrollToTheProduct() {
cy.get('[title="iPod Touch"]').eq(0).scrollIntoView().click();
}
}
const login = new LoginPage();
export default login;
SearchProductPage.js
/// <reference types ="cypress"/>
class SearchProduct {
 SearchProduct(searchProductName) {
   cy.get('[name="search"]').eq(0).type(searchProductName);
   cy.get('[type="submit"]').eq(0).click();
 }
 verifyProduct(productName) {
   cy.contains(productName);
 }
}
const searchProduct = new SearchProduct();
export default searchProduct;
Need a global unique identifier? Generate random GUIDs quickly and easily with our free online Random GUID Generator tool in seconds. Get a new GUID every time.
How to set up Cucumber and create a feature file?
In this section of this Cypress Cucumber tutorial, we will install and set up Cucumber and create a feature file to perform testing.
Installing Cucumber
Step 1: To install Cucumber, run this command.
npm install — save-dev cypress-cucumber-preprocessor
Terminal output:

Once installed, Cucumber devDependency in package.json can be seen below.
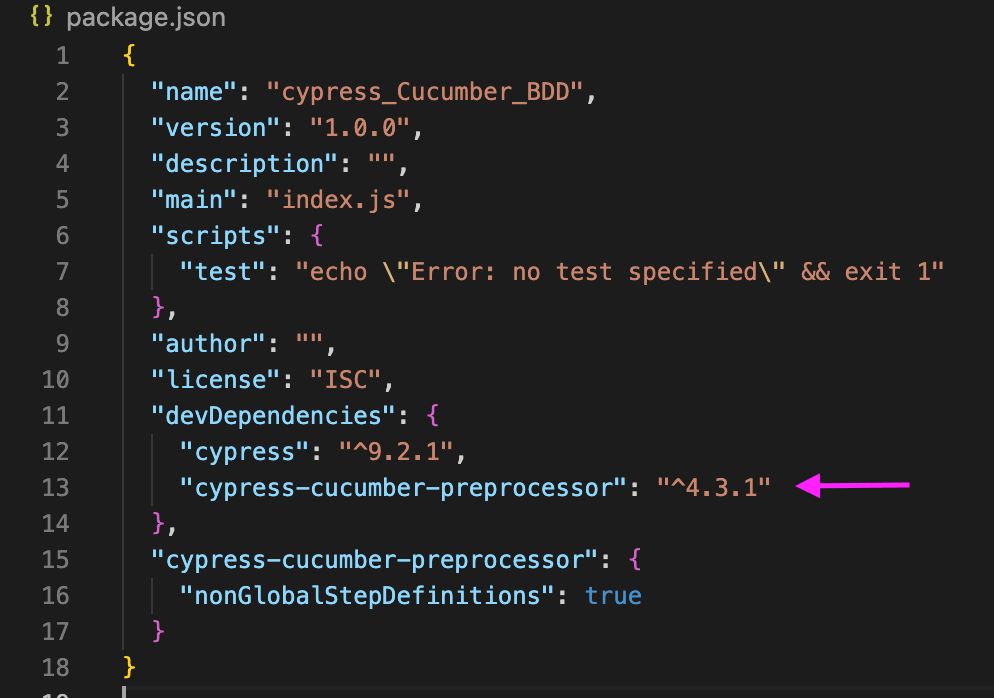
Step 2: Add below code snippet in cypress > plugins > index.js.
const cucumber = require("cypress-cucumber-preprocessor").default;
module.exports = (on, config) => {
 // "on" is used to hook into various events Cypress emits
 // "config" is the resolved Cypress config
 on("file:preprocessor", cucumber());
};
Step 3: Add the below code snippet in package.json.
"cypress-cucumber-preprocessor": {
   "nonGlobalStepDefinitions": true
 }
Step 4: Add the below line in cypress.json.
{
 "testFiles": "**/*.feature"
}
Need a fake IP address for your testing projects? Use our free online Random IP Generator to quickly generate fake IP addresses with just a few clicks: lambdatest.com/free-online-tools/random-ip-..
Create a feature file
After creating Test and Page folders, the next in this Cypress Cucumber tutorial fis to create a .feature file.
At the Tests folder level, create the feature files with the name LoginTest.feature and SearchProductTest.feature.
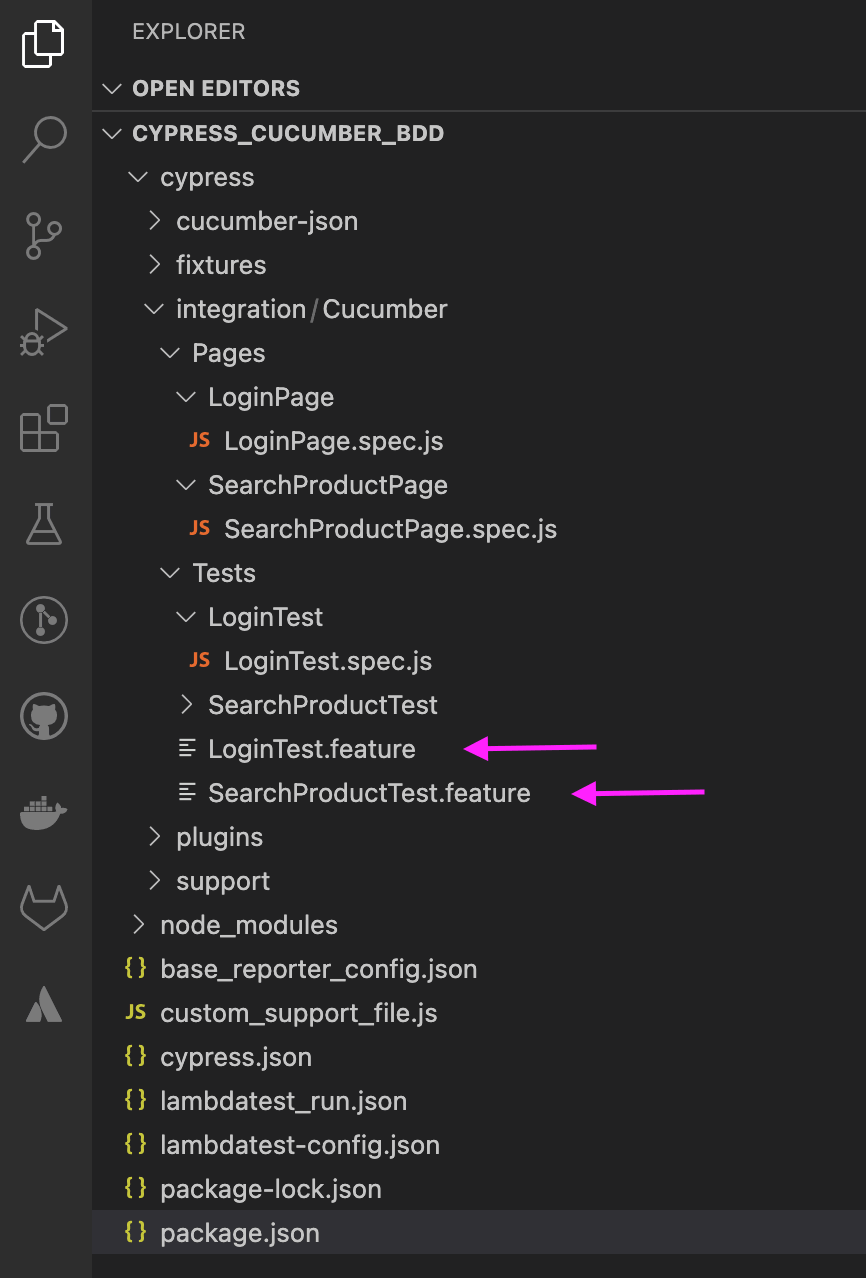
LoginTest.feature
Feature:  I want to login into the site with valid data

 Background:
     Given I navigate to the Website
 Scenario: Login as new sign up user with valid data
     When I entered valid credential
         | email                  | validpassword |
         | lambdatest@yopmail.com | lambdatest    |
     And User click on sign in button
     Then Validate the title after login
SearchProductTest.feature
Feature:  I want to login into the site with valid data

 Background:
     Given I navigate to the Website
 Scenario: Login as new sign up user with valid data
     When I entered valid credential
         | email                  | validpassword |
         | lambdatest@yopmail.com | lambdatest    |
     And User click on sign in button
     Then Validate the title after login
 Scenario: Search the Product
     When User search the product
     Then Validate the product after search
         | product | productaftersearch |
         | VAIO    | Sony VAIO          |
Need a random MAC address for your work? Our online random mac generator tool is fast and easy-to-use for generating random MAC addresses with just a few clicks.
How to run Cypress test cases locally?
You can run the test case from the command line or Cypress runner. However, in this section of this Cypress Cucumber tutorial, we will execute test cases using Cypress runner.
Open the Cypress test runner with the following command.
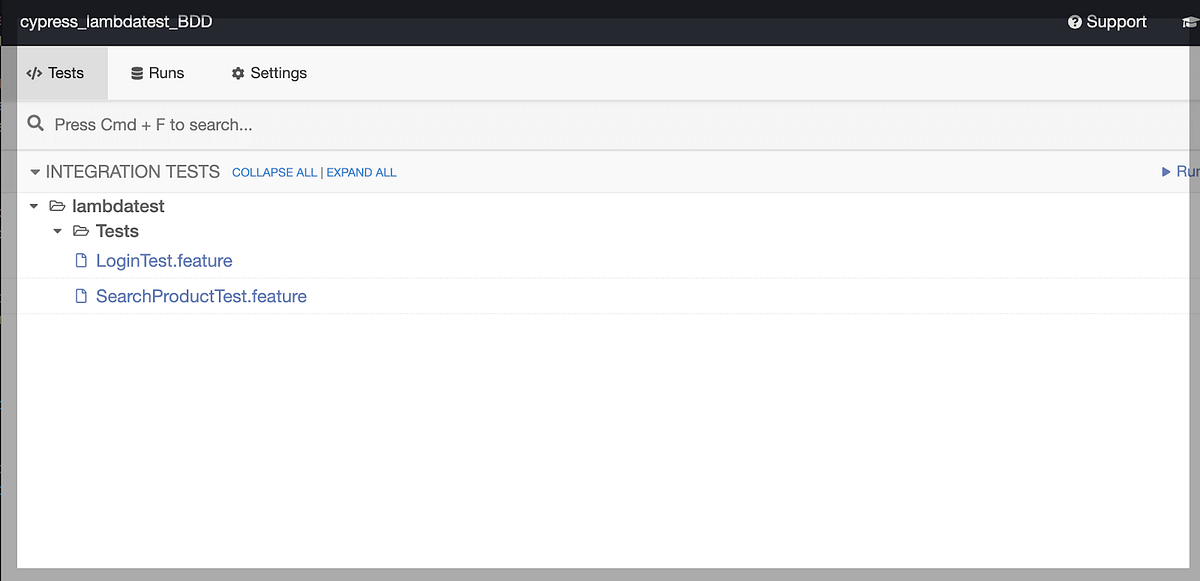
The above command will open the Cypress test runner with the existing test cases. From Cypress runner, we can select the browser you want to run the test cases.
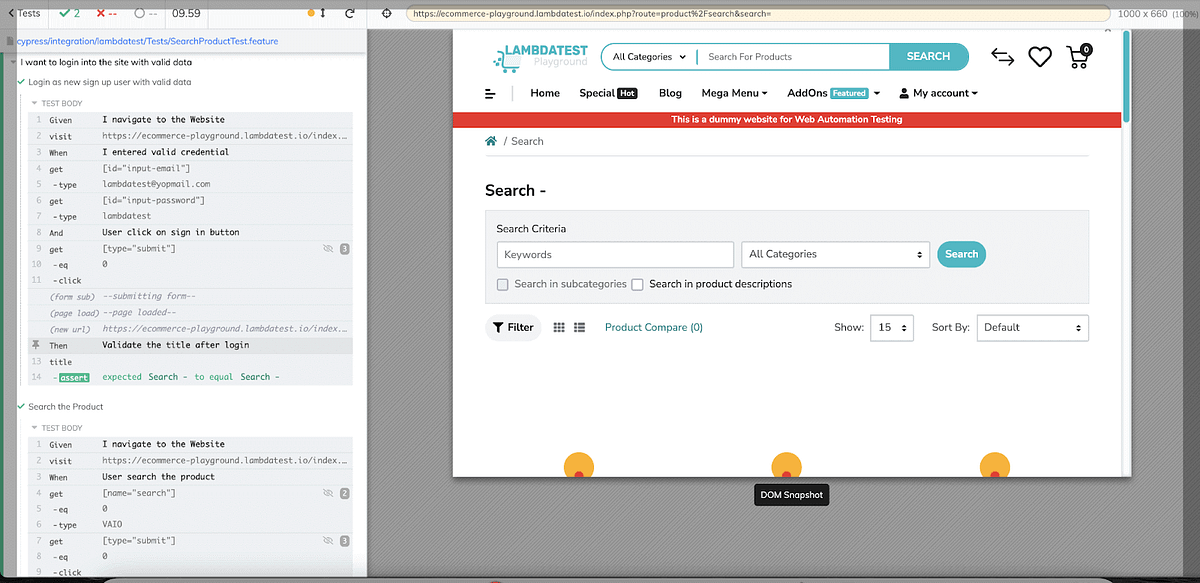
In the below screenshot, we can see both test case .feature files displaying in the Cypress test runner.
Need a block of text? Use our random paragraph generator to create random paragraphs and add some variety to your content and keep your audience interested.
Running the first test case
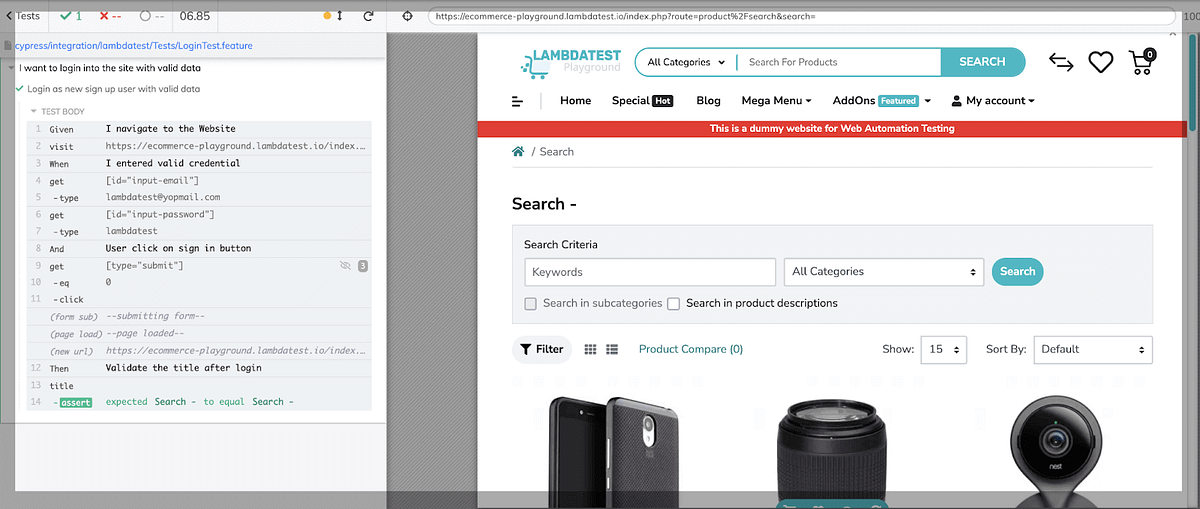
Clicking on the first .feature, the first test case starts executing the test case.
Below screenshot shows when the test case runs successfully.
In the below screenshot, we can see steps under GIVEN, WHEN, AND, and THEN executed successfully.
Running the second test case
Clicking on the second .feature, the second test case starts executing the test case. In the below screenshot, we can see products are loading, and the test case for product search is passed successfully.
Also, we can see steps under GIVEN, WHEN, AND, and THEN executed successfully.
Keep your data safe and secure by using our free online Base64 Encoder. With our tool, you can easily convert any type of data into a secured Base64 string. Try it now.
How to run tests on the cloud Cypress grid?
In this section of this Cypress Cucumber tutorial, we will execute the test cases on LambdaTest’s cloud Cypress grid. LambdaTest is a cloud-based cross browser testing platform that permits you to accomplish Cypress end-to-end testing for web applications across multiple browsers, operating systems, and devices.
Subscribe to the LambdaTest YouTube channel for tutorials around Selenium testing, Playwright browser testing, Appium, and more.
Note: To perform testing on the LambdaTest platform, you must signup on LambdaTest and get the username and the access token from the LambdaTest Profile Section to run the test cases.
Need to decode Base64 strings but don’t know how? Our Base64 decoder tool is the easiest way to decode Base64 strings. Simply paste your code and get decoded text in seconds.
Setting up LambdaTest for Cypress test case execution
Step 1: Install the CLI
Setup LambdaTest using Cypress CLI command via npm. LambdaTest’s command-line interface permits you to run your Cypress UI tests on LambdaTest.
npm install -g lambdatest-cypress-cli
Step 2: Generate lambdatest-config.json
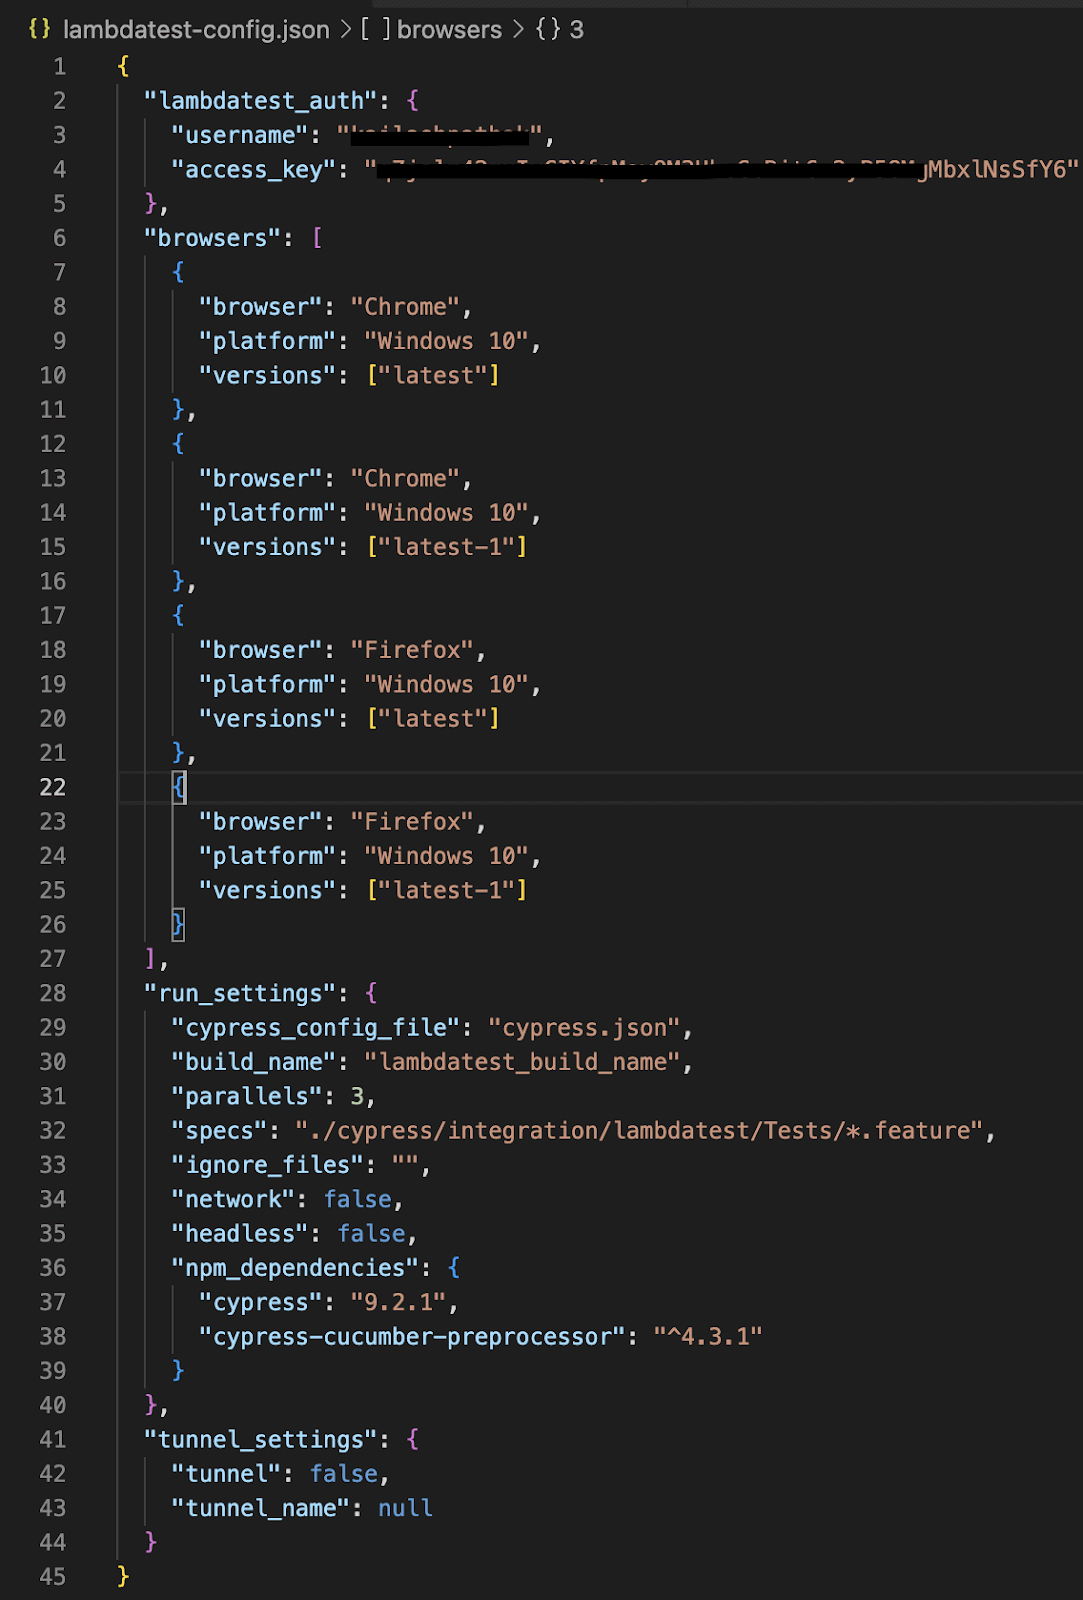
Under the root folder, configure the browsers on which we want to run the tests. Use the init command to generate a sample lambdatest-config.json file or create one from scratch. Use the below command.
lambdatest-cypress init
In the generated lambdatest-config.json file, fill in the required values in the section lambdatest_auth, browsers, and run_settings to run your tests.
Quickly convert HTML entities to text with our online HTML Entities to Text Converter tool. Get clean, readable text in just a few clicks.
Running the Cypress tests on LambdaTest cloud
To get accurate testing results, you must run Cypress tests on real browsers and OS. The best way to do this is by using LambdaTest’s continuous quality platform. This way, you can accelerate your go-to-market delivery by performing Cypress parallel testing on 40+ browser versions across Windows and macOS.
Run the below command to execute the test case on LambdaTest.
lambdatest-cypress run — sync=true
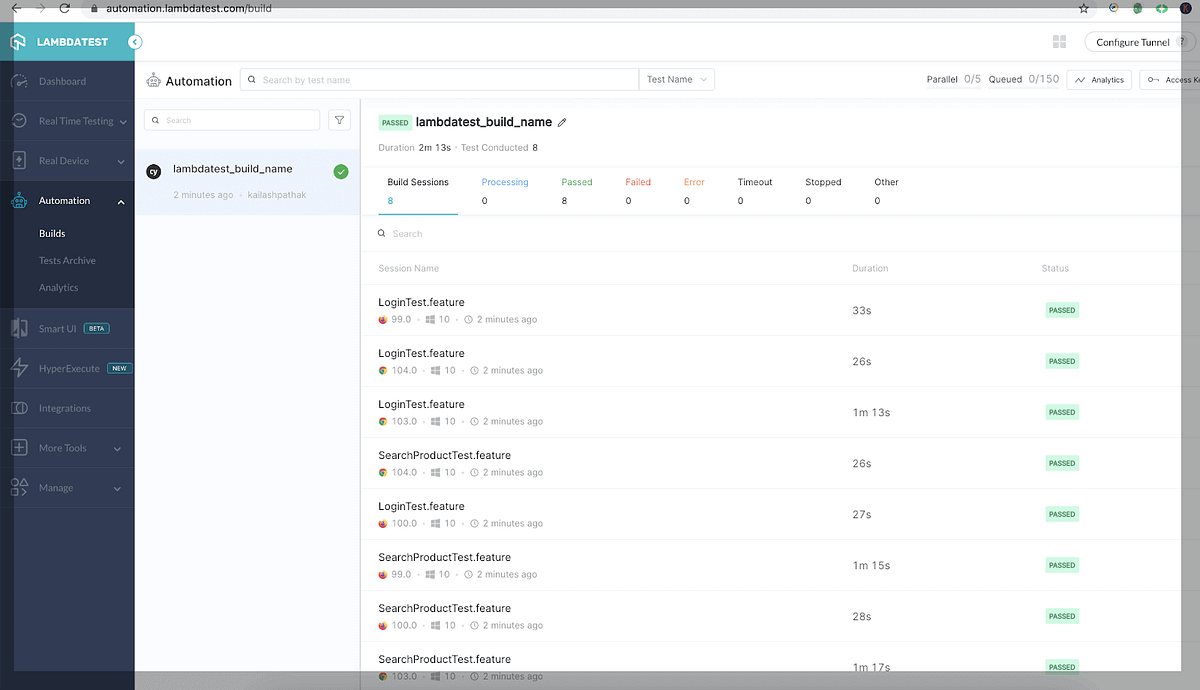
As we run the above command, test case execution starts in the LambdaTest platform in different browsers.
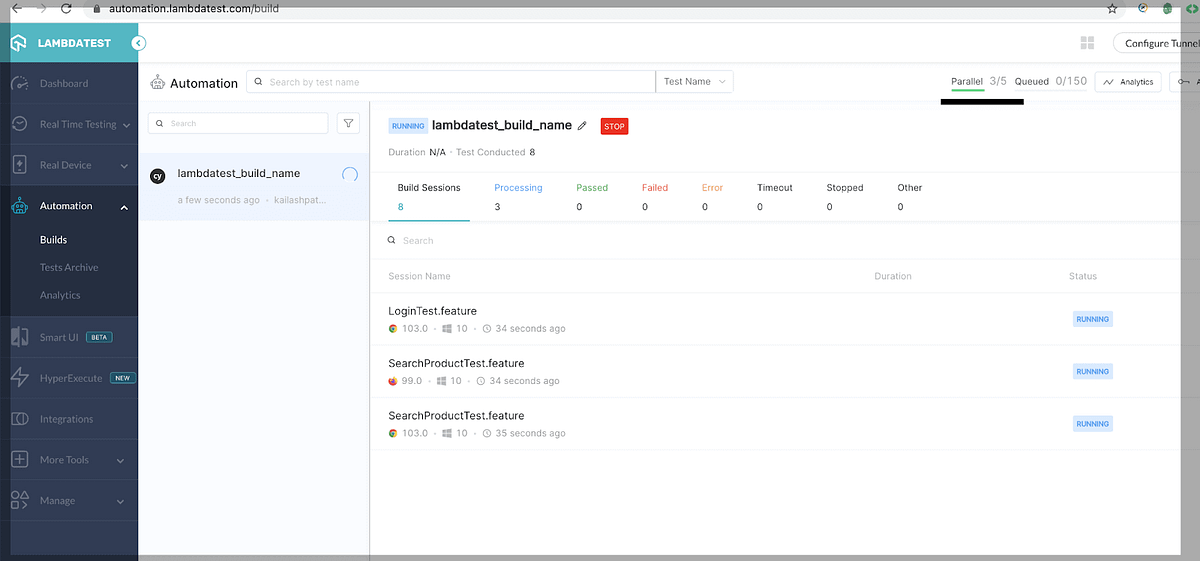
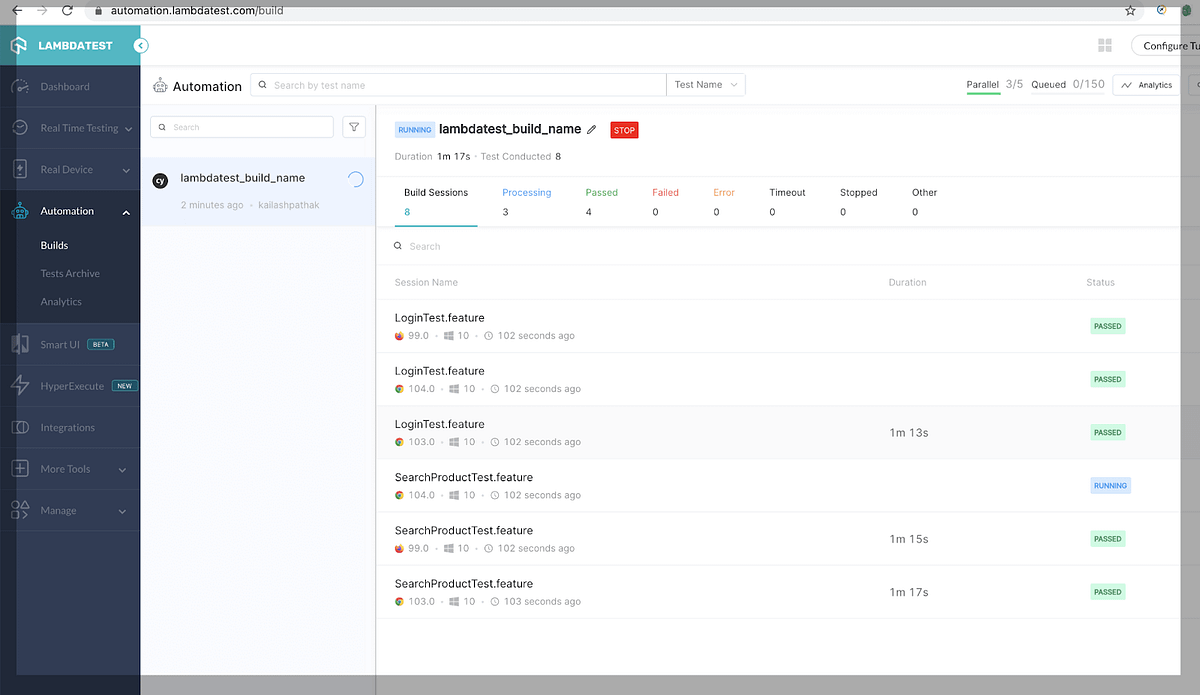
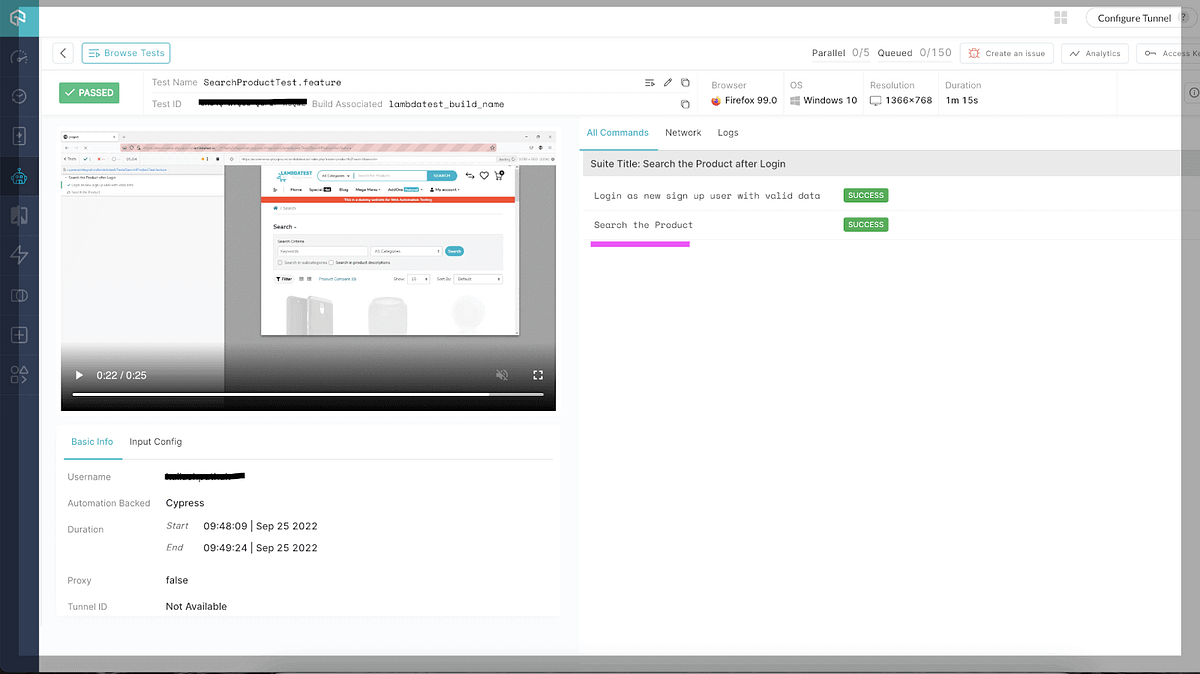
The screenshot below shows that all test cases are passed in the LambdaTest platform.
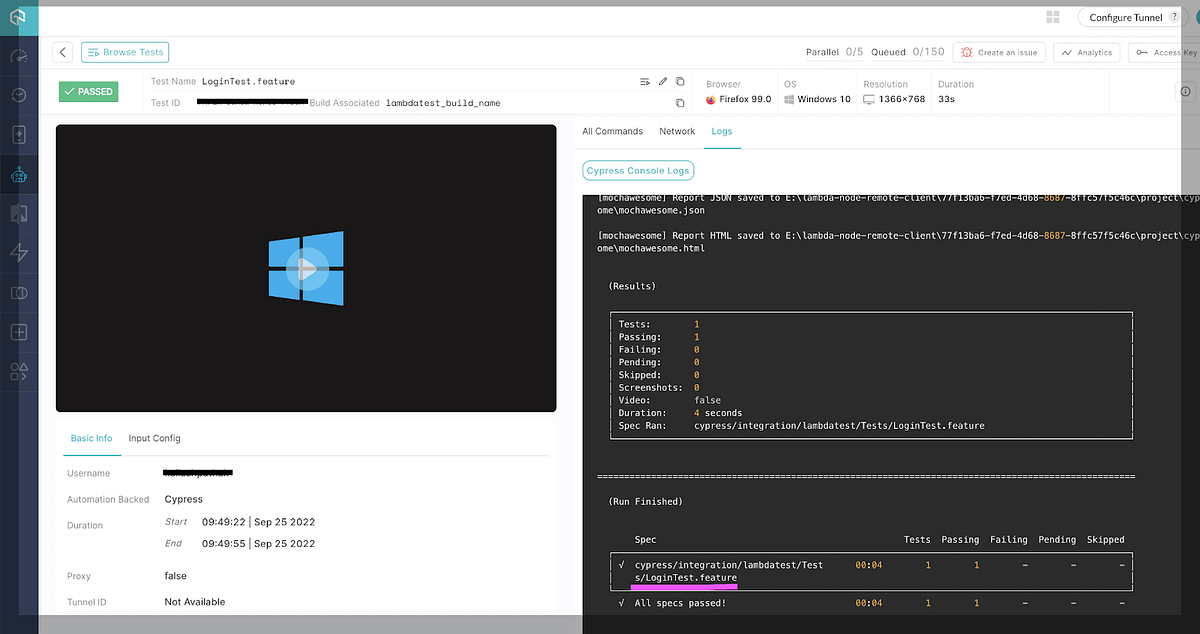
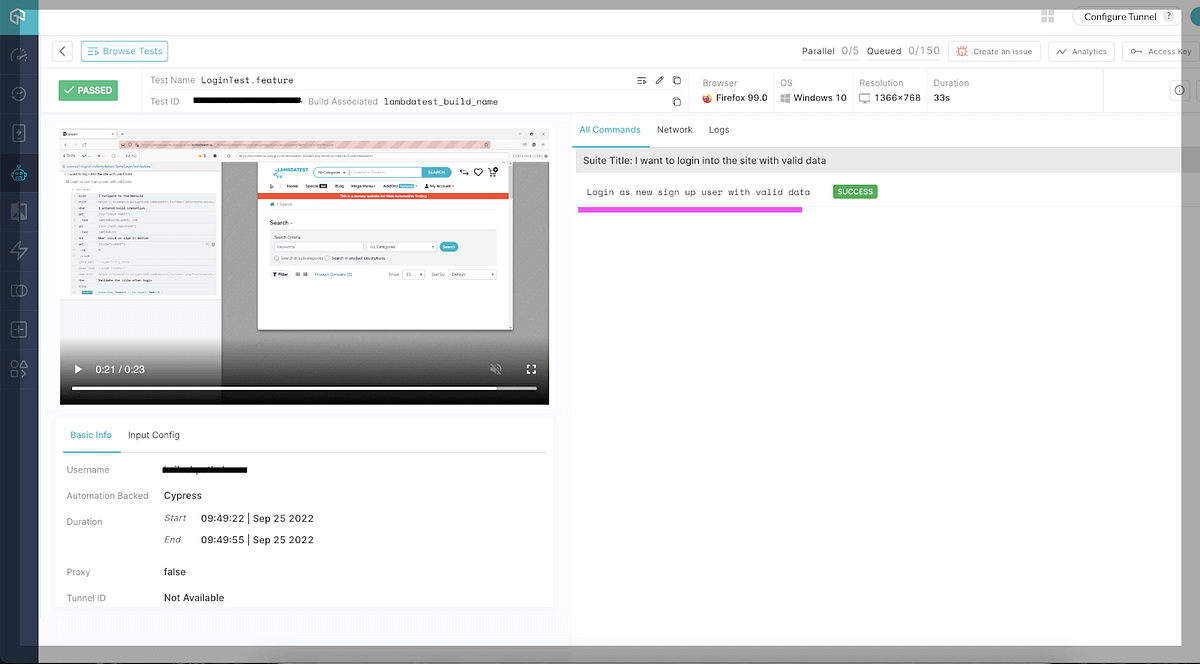
In the below screenshot, we can see LoginTest.feature file runs successfully.
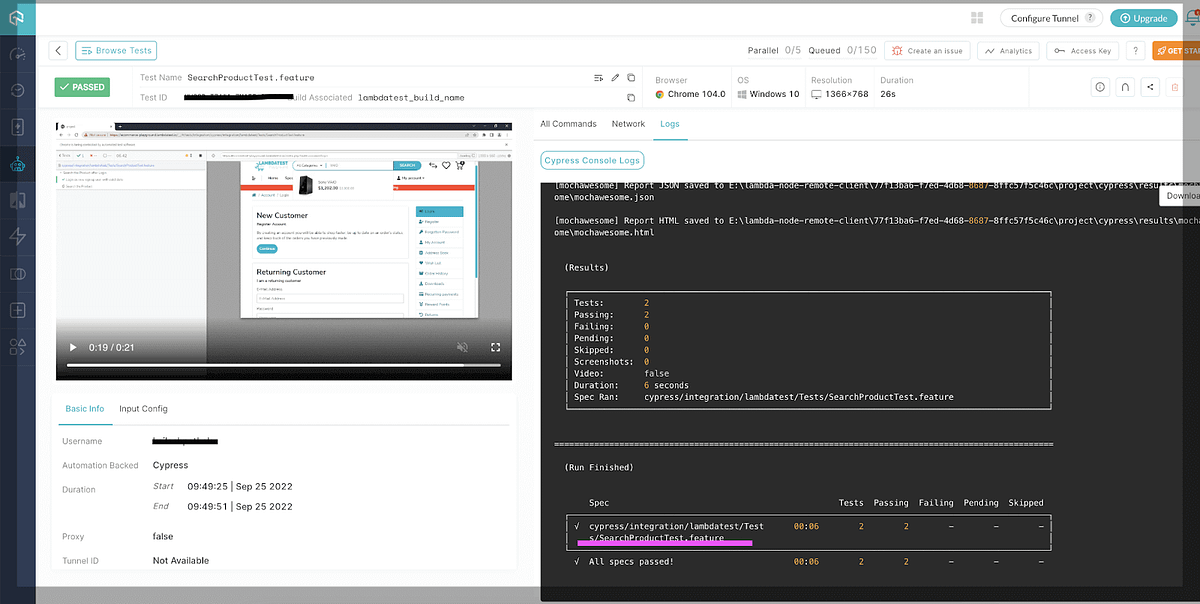
In the below screenshot, we can see SearchProductTest.feature file runs successfully.
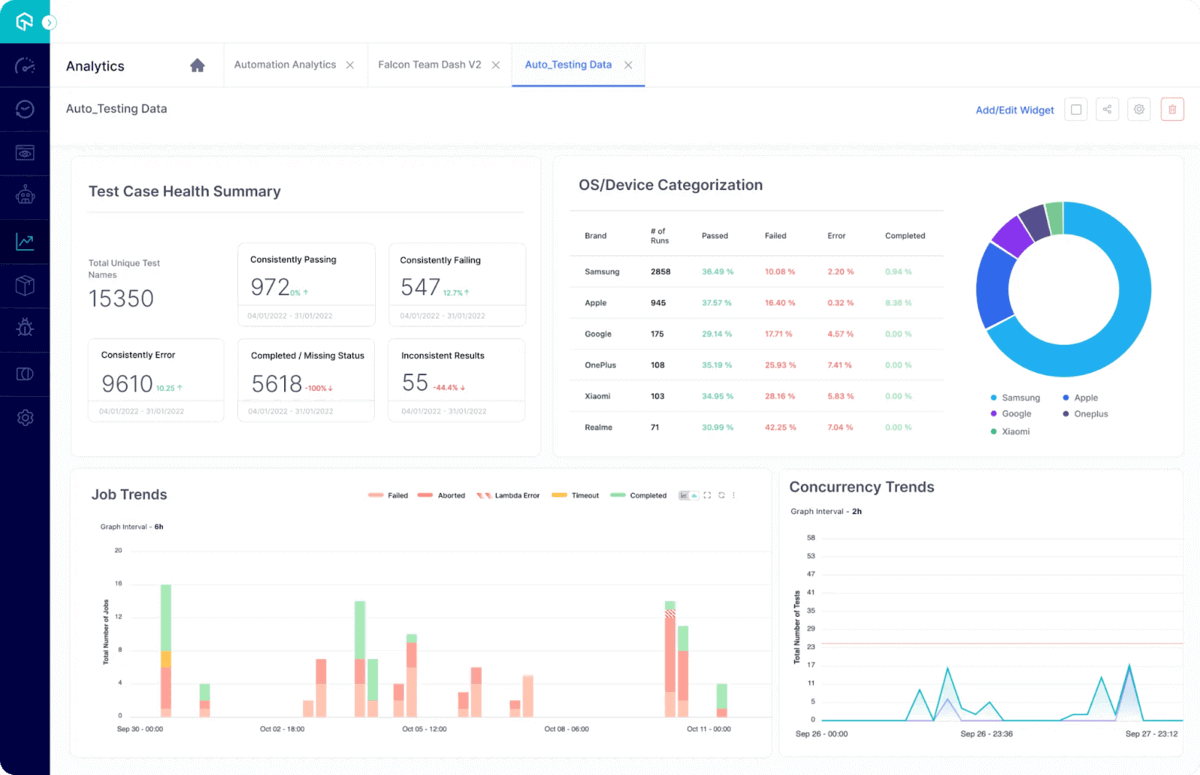
You can also navigate through the New Analytics Dashboard, which allows you to create custom dashboards and quickly drill into various metrics by creating a custom view. The metrics and KPIs most important to you can be embedded in a dashboard. This will give you at-a-glance insights into your test details on the dashboard.
Take the first steps toward mastering your Cypress automation skills with the Cypress 101 certification. This certification is a great way to learn how to use Cypress and how to use end-to-end testing in your development workflows.
Wrapping Up
Cucumber is a well-known robust Behavior-Driven Development (BDD) framework that enables you to write test cases that anybody can apprehend, regardless of their technical knowledge. In this Cypress Cucumber tutorial, we have seen how the combination of Cypress and Cucumber provides a robust framework that permits you to form purposeful tests in a simple method.
Cucumbers can also easily integrate with powerful cloud testing platforms like LambdaTest, a cloud-based cross browser testing tool that allows you to perform cross-browser testing for web applications across over 3000 browsers, operating systems, and devices. You can learn more about some tips & tricks through the hub on cypress tips and tricks.
